Need Parts to Fix your Vacuum? Call Us 800-322-2965
Troubleshooting Problems And Solutions
ThinkVacuums is here to help with your central vacuum repair needs! Here you will find helpful Central Vacuum Troubleshooting tips & advice. If you need Local Central Vacuum Repair and live in Southern Florida, Broward or Palm Beach County, contact Gator Vacuum & Sewing Co. Our vacuum service center (954.341.4323) has been in the same location for over 23 years.
Central Vacuum Service
If you are handy and would rather fix things on your own, our do it yourself service solutions are in the troubleshooting guide below. Here you will learn quick solutions that may help with fixing your central vacuum system. The troubleshooting section is full of expert central vacuum repair advice and knowledge that includes possible causes and solutions. If you prefer speaking with a live repair technician, simply contact us toll-free at 1.800.322.2965. ThinkVacuums.com central vacuum service experts are more than happy to help!
Top 4 Reasons People Service Their Central Vacuum
Problem 1: There is Little or No Suction Power
Check your hose to see if there is nothing stuck inside.
Check the suction power in all the outlets, if one or more outlet has good suction then the problem lies within the piping system.
Check to make sure the bucket is well installed and clamped to the main head.
Check the suction power of your central vacuum at the unit by disconnecting the piping from the “IN”. If there is suction, the problem lies within the piping system.
If the unit has two motors, make sure that both motors are working.
Check if your dust bag is not full. If so, please install a new bag and retry the unit for suction power. If you do not have a replacement bag, you can use the unit without.
Clean the main filter by washing it with a damp cloth and drying it out thoroughly. Reinstall the main filter and check the unit for suction power. THE MAIN FILTER MUST BE INSTALLED AT ALL TIMES.
Check the circuit breaker on your electrical panel.
Check the circuit breaker of the unit.
Check the 24-volt circuit:
To check the 24-volt circuit, proceed as follow;
Establish contact between the two ports of a wall-mounted air inlet valve with a piece of metal (ex. coin). If the system starts, the suction hose is defective. If the system does not start to check the 24-volt circuit on the unit; Establish the contact between the two screws of the 24 volts circuit plate using a piece of metal(ex. Screwdriver). If the unit starts, the 24-volt wire is either cut OR unplugged from one of the wall-mounted air inlet valves.
If the system still does not start after steps 1, 2 and 3, the printed circuit is defective.
Disconnect one of the two 24 volt wires on the unit. If the unit stops, the two wires are in contact somewhere in the circuit OR a wall-mounted air inlet valve is defective. If the unit does not stop, the printed circuit is defective. Call your dealer.
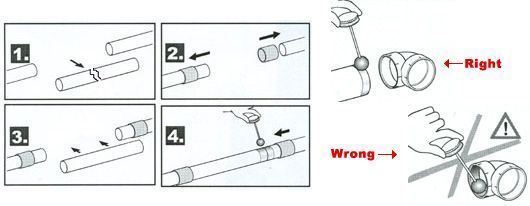
This is another common cause of suction loss. This problem may occur when someone in the attic area steps on the pipe by accident. How to fix a crack in PVC pipe: How to replace a section of piping
Cut out the defective pipe section.
Slide over the existing pipe a pair of slip couplings.
Insert the new pipe section in position.
Apply PVC glue and slide back into position the two slip couplings and you're done!
Helpful Tip Practice the procedure several times without the glue so that when you apply the glue, this procedure will be problem-free.
NOTE: If you notice a vibration coming from the motor, call your dealer.
Check each "X" for Probable Cause Then read below for explanation.
No Airflow
Low Airflow
Power Unit Doesn't Run
Power Unit Continues To Run
Cycles Off and On
X
X
X
1. Power Cord
X
X
2. Push-to-Reset Breaker on Unit
X
3. Circuit Breaker in House Panel
X
X
X
4. Internal Thermal Switch in Unit
X
5. Electrical Wall Outlet Plug
X
6. Switch in the Wall Inlet Stuck Off
X
X
X
7. Switch in the Wall Inlet Stuck On
X
X
8. Remote Control Wire Broken
X
X
9. Remote Control Wire Shorted
X
X
10. Flexible Hose Plugged
X
11. Tubing in Walls Clogged
X
X
12. Dirt Canister Lid - Off
X
13. Dirt Canister Gasket Loose
X
14. Dirt Canister Not Latched
X
15. Outside Exhaust Blocked
X
16. Another Wall Inlet Door Open
X
X
17. Blower Protection Screen Clogged
X
X
X
18. Loose Wire in Power Unit
X
19. A Hose Plugged into Another Inlet
X
20. PC Board Relay Stuck ON
X
21. PC Board transformer Burned Out
X
22. LED Light
Symptom Details
1
Power Cord - Make sure that the power cord is plugged in and receiving the proper voltage and current for your unit.
2
Push-to-Reset Breaker - If your unit has experienced an overcurrent or extremely high temperature, the button will pop out. To reset, simply push the button in until it protrudes about 1/8" and stays in. If the breaker pops out again when the unit is used, call a service technician.
3
Circuit Breaker in House Panel - Check your house breaker panel - if the circuit breaker is off, you may have too many appliances utilizing that circuit. For the best results, your power unit should be on a separate circuit. Try to remove some of the extra circuit load by unplugging other devices. If the breaker continues to cut off, call a service technician.
4
Internal Thermal Switch in Unit - If your unit comes equipped with an internal thermal switch and quits running, it may require 10 minutes to cool off before resetting itself.
5
Electrical Wall Outlet Plug - Sometimes the electric wiring from the house breaker panel to the wall outlet plug can become loose or broken. Plug a lamp or another electric appliance into the outlet to assure that you are getting power. If not, call your electrical contractor.
6
Switch in the Wall Inlet Stuck Off - Plug your flexible hose into the other wall inlets - if your unit functions normally then the problem lies in the switch or remote control circuit to the inoperative inlet valve. The bolts holding the micro-switch in the inlet valve may have loosened allowing it to move out of position. Remove the wall inlet faceplate and tighten the bolts or call a serviceman.
7
Switch in the Wall Inlet Stuck On - Use your finger to roll the steel ball located in the top of the neck in the inlet. Some foreign material may have become lodged in the hole with the ball, preventing it from moving into its proper position. Caution: if this procedure does not turn your unit off, unplug the power cord and notify a service technician.
8
Remote Control Wire - Broken - Usually, if more than one wall inlet is inoperative, the trouble is in the remote control wiring, and the wire is either loose or broken and should be tightened or replaced.
9
Remote Control Wire - Shorted - Unplug one of the remote control wires that are attached to the side of the power unit - if the unit stops, it indicates that the remote control wire is shorted or one of the wall inlet switches is stuck in the ON position. If the procedure for number 6 does not shut the unit off and you cannot locate the short, notify a serviceman. If the unit does not stop running when you unplug the remote control wire - either the short is in the power unit wiring or the relay is stuck.Refer to number 20. Caution: Checking the wiring in the power unit should only be attempted by a qualified service technician.
10
Flexible Hose - Plugged - If proper airflow is not obtained through the house, remove the hose from the vacuum inlet, then start the power unit by activating the wall inlet switch. If the airflow at the inlet is good, then this will normally indicate a blockage in the hose or the wand. If a blockage is in the wand, it can be disassembled and cleaned. If there is a blockage in the hose, the hose should first be laid out straight, then with the house plugged into the inlet valve and the power unit running, pick up the hose - starting at the end furthest from the valve and gently stretch about 2 feet of it at a time as you proceed along the length of the hose toward the inlet valve. If this does not clear the stoppage, then remove the hose cuffs by unscrewing them, and switch them to the other ends of the hose (these cuffs have left-hand screw threads so rotate them in a clockwise direction). After this has been done replace the hose in the inlet valve and with the power unit operating, repeat the process of stretching the hose. If this fails to unclog the hose, run (handle first) a screwdriver with at least a 3/4" diameter handle through the hose.
11
Tubing in Wall - Clogged - Check the airflow at the power unit. If the airflow is good here but not at locations further from the power unit, your tubing is either clogged or has broken open. If you cannot repair this, contact your serviceman. If you turn the power unit on and leave the inlet valve furthest from the power unit open and then check the exhaust from the power unit, you can determine whether you have a break in the tubing or whether the tubing is clogged. If very little air is coming out of the exhaust of the power unit, then it is probably an obstruction in the tubing and not a break.
12
Dirt Canister Lid - Off - On the models with lift-off dirt canister lids, the lid must be replaced squarely on top of the canister or it will allow a vacuum leak.
13
Dirt Canister Gasket - Loose If the dirt canister gasket has been pulled loose, it will allow a vacuum leak. The gasket may be reattached with contact cement or any of the so-called 'super glues'.
14
Outside Exhaust - Blocked - Check the exhaust system by removing the tubing from the motor blower exhaust and comparing the airflow at this point versus the airflow reaching the outside. If blockage id detected and cannot be removed, contact your service technician.
15
Dirt Canister - Not Attached - If the dirt canister latches (some models only) are not properly closed, it will cause an air leak along the gasket and reduce your cleaning ability.
16
Another Wall Inlet Door - Open - Check all the inlet valves to make sure that only one inlet is in use at a time. Attempting to clean from two or more inlets at a time will reduce the airflow below the level required to deep clean your carpets.
17
Motor Protection Screen - Clogged - This usually occurs due to allowing the dirt canister to overfill, or a broken filter bag (some models).
18
Relay Stuck - On - Refer to #9. If after using the procedures described it appears the relay is sticking on, unplug the power cord to cut off all electricity to the power unit. Caution: Checking the wiring in the power unit should only be attempted by a qualified service technician.
21
Relay Stuck - Off - If the procedures described in #1, 2, 3, 4, 5, 6 or 7, do not correct the power unit not starting, then it could be a malfunction of the relay, the low voltage transformer could be burned out, or there could be a loose wire in the power unit. If you suspect a malfunction in the power unit, contact your service technician.
22
Transformer - Burned Out - Refer to #21
23
Loose Wire in the Power Unit - Refer to #21
24
A Hose Plugged Into Another Inlet Valve - Cleaning from more than one inlet at a time will reduce the airflow to less than is required to deep clean your carpets.
25
P.C. Board Relay Stuck On - Refer to #9. If after using the procedure described in #8 it appears that the relay is sticking on, unplug the power cord to cut off all electricity to the power unit. Caution: Checking the wiring in the power unit should only be attempted by a qualified service technician.
26
P.C. Board Transformer Burned Out - If the procedures described in #1, 2, 3, 4, 5, 6 or 7 do not correct the power unit not starting then it could be a malfunction of the relay, the low voltage transformer could be burned out, or there could be a loose wire in the power unit. If you suspect a malfunction in the power unit, contact your service technician.
27
LED Light - Some units have an LED light at the unit. If the LED light is not on, refer to #5. If you have power at the unit but LED light is off, contact your local service technician.
Other Helpful Central Vacuum Pages You Might Find Interesting:


Log In
Create New Account