


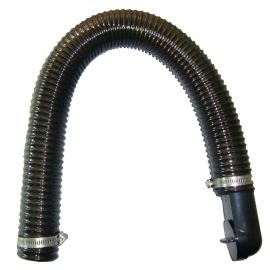
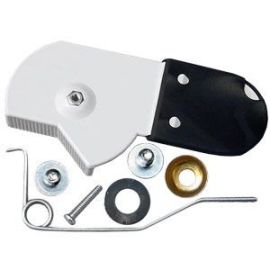
VacPan Automatic Dustpan


More Views
Product may vary from image displayed.
CON:AD:0002

As low as
$29.74
")
Compatible with the following Brands & Models
(hover over each)
- Aggresor Please Call
- AirVac Please Call
- Astrovac Please Call
- Beam Please Call
- Black & Decker Please Call
- Broan Please Call
- Brute Please Call
- Budd Please Call
- Cana-Vac Please Call
- Centralux Please Call
- Cirrus Please Call
- CV International Please Call
- Dirt Devil Please Call
- DrainVac Please Call
- DuoVac Please Call
- DustCare Please Call
- Easy-Flo Please Call
- Electrolux Please Call
- Eureka Please Call
- Fasco Please Call
- Filtex Please Call
- Fridgidaire Please Call
- Hayden Please Call
- HoneyWell Please Call
- Hoover Please Call
- Imperium Please Call
- Kenmore Please Call
- MD Please Call
- Nadair Please Call
- NuTone Please Call
- Patton Please Call
- PowerStar Please Call
- Pullman-Holt Please Call
- PurVac Please Call
- Riccar Please Call
- Royal Please Call
- Sequoia Please Call
- Signature Please Call
- Simplicity Please Call
- Smart Please Call
- VacuFlow Please Call
- VacuMaid Please Call
- Valet Please Call
- Vent-A-Vac Please Call
- Walvac Please Call
- Whirlpool Please Call
- Zenex Please Call
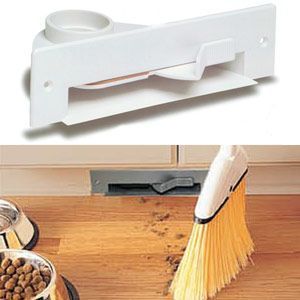
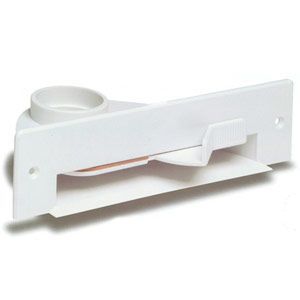
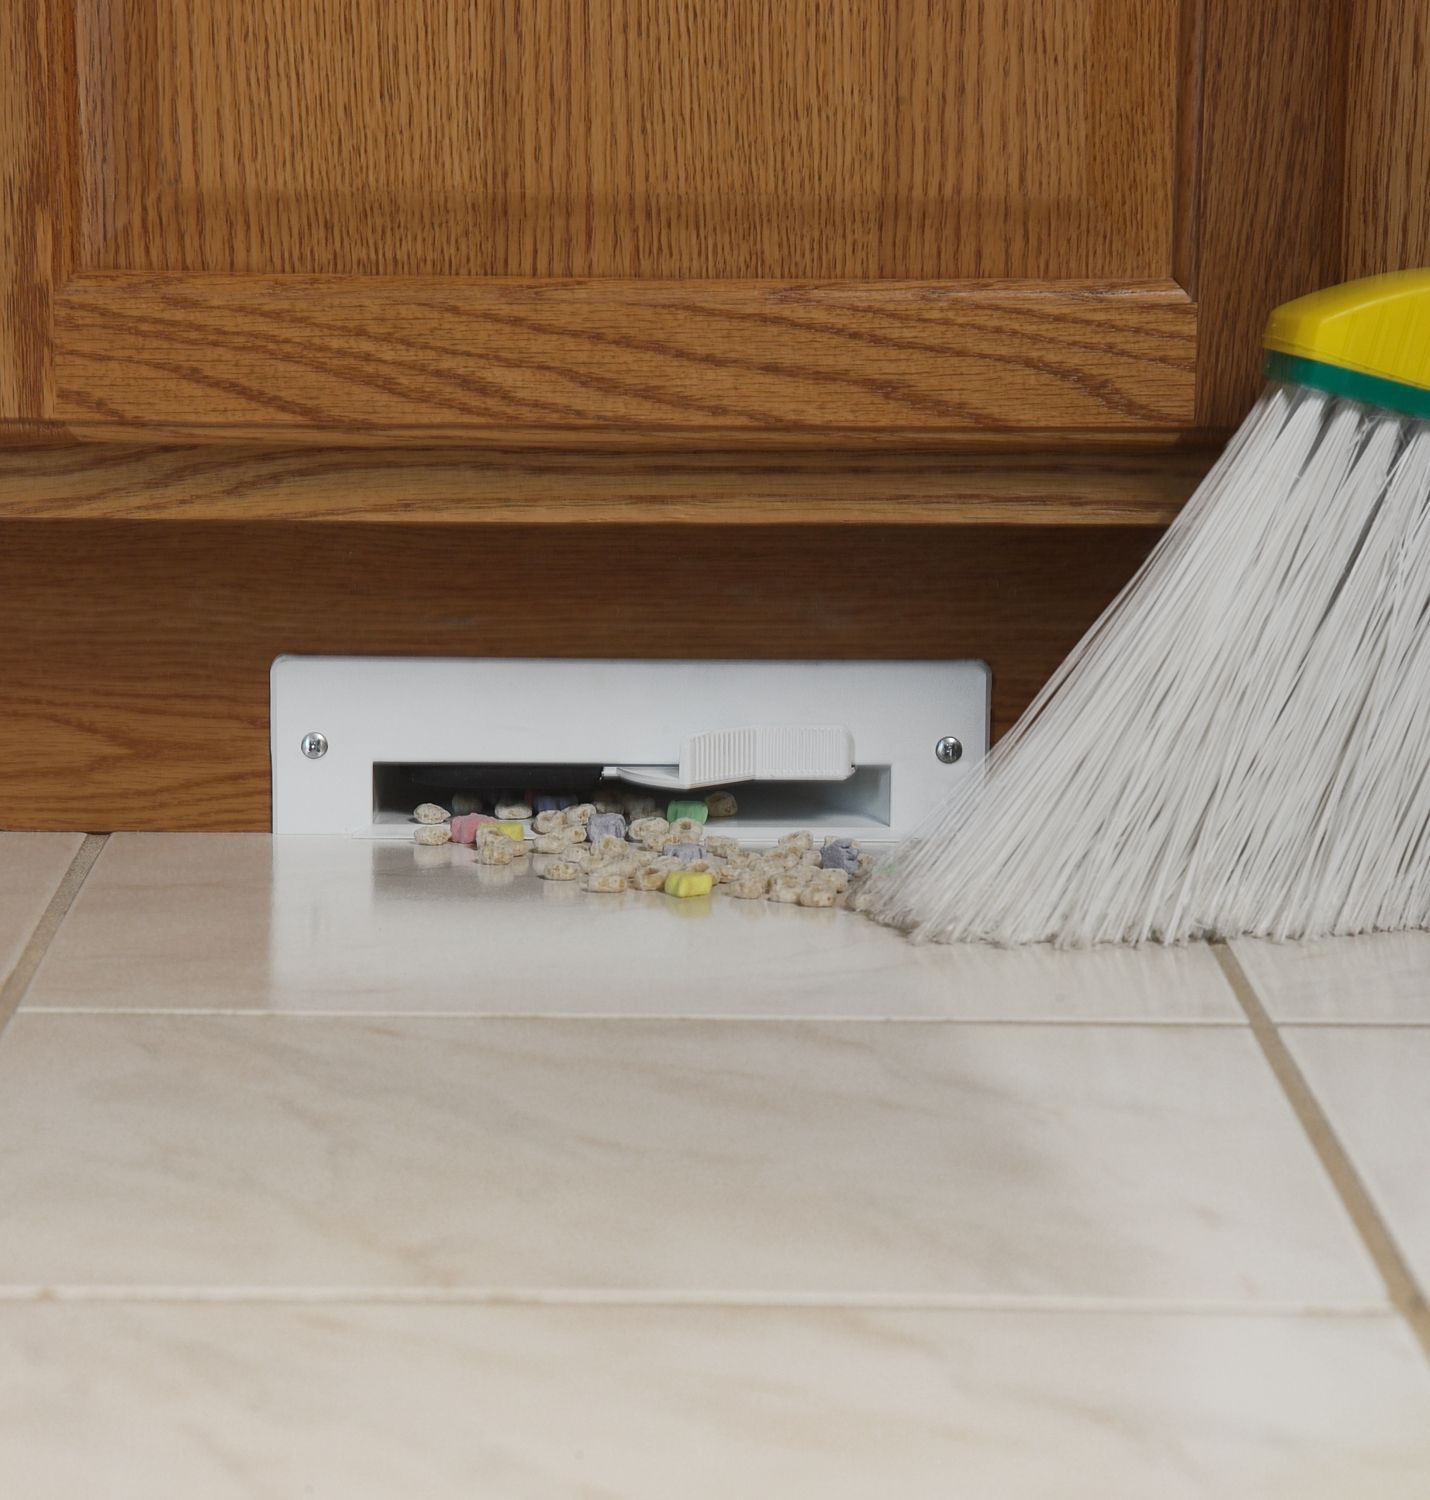
With the VacPan there no need to bend down to use a dustpan. Simply sweep dust, dirt, and debris into the VacPan, touch the toe switch and its whisked away. Ideal in a kitchen, bathroom, or laundry room.
Get Swept Away! The VacPan automatic dustpan is the perfect companion for any central vacuum system. Flush mountable to your wall or cabinet kickboard, the VacPan is the convenient way to clean up dirt and debris when using a broom. Using the VacPan is easy. Simply turn the convenient foot switch to the on position and sweep dirt and debris toward the VacPan. The powerful suction from your central vacuum system does the rest. Installation is easy using standard fittings and pipes and can be installed in new and existing homes features a central vacuum system.

Easy Ordering
As Simple As 1-2-3
As Simple As 1-2-3
1SELECT PRODUCT OPTIONS
The VacPan is a must-have for any existing or new central vacuum

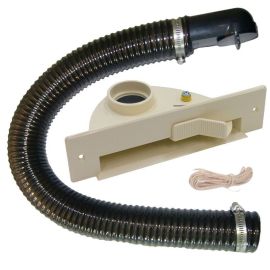
Original VacPanThe Original VACPAN adds a new dimension of convenience to your central vacuum by giving your broom the power of a central vac. Simply brush dirt and debris toward the powerful suction plate and your floor is clean - instantly! Also available is the VacPan II which is a dual function central vacuum inlet valve system. This VacPan model offers the added convenience of a standard hose wall inlet in one compact design. Each VacPan model provides unique benefits, allowing you to pick the right model for every room. VacPan & VacPan II may be added to existing or new installations.
VacPan Installation Instructions
Using the VacPan is easy. Simply turn the convenient foot switch to the on position and sweep dirt and debris toward the VacPan. The powerful suction from your central vacuum system does the rest.
The VacPan is a perfect fit for any room where you sweep - kitchens, workshops, and garages. Installation is easy using standard fittings and pipes and can be installed in new and existing homes features a central vacuum system.
VacPan Installation Tips
- Plan the location of your Original VacPan to be conveniently located for sweeping clean-ups. Also, consider ease of access to vacuum tube piping connections during installation.
- The leading edge of the Original VacPan must sit flush with the finished floor.
- For maximum clearance, use Plastiflex part #SV8052 Universal Short 90 degree Elbow for connections to VacPan.
- Do not glue the connection between Original VacPan and elbow, to allow for future removal.
- Prior to final installation, check for an airtight seal between Original VacPan and elbow. Teflon tape may be used if required.
- Allow for 1/2" vertical play in vacuum tube piping an Original VacPan location, so that final piping connections can be made.
- In-Wall Installations
VacPan In-Wall Installations
 Original VacPan can be installed between wall studs inside walls.
- Original VacPan should be located tight to one side in stud space.
- Once the Original VacPan location is determined, cut a 6-3/4" long x 1-3/4" high slot in the wall and baseboard to accept the Original VacPan.
- The 2 x 4 wall bottom plate between the two studs must be removed. This can be achieved from below using a hole saw.
- In new home construction, the bottom wall plate can be removed directly. A 6-3/4" length of 2 x 4 can be used as a temporary rough in the block, that will force all trades to finish around, leaving a slot for the Original VacPan Floor contractor must run flooring under the block.
- Run vacuum tube piping and low voltage wire from the mainline to Original VacPan location.
- Access for final piping connections must be made.
Inlet Types and Installation Diagrams

Access From Below
If access is available from below, cut an access hole through the subfloor underneath the wall between the studs, positioned so that final piping connections can be made by reaching through the access hole.
Access Through Wall
Access can be made through the finished wall. Cut a 2-3/4" x 3-1/2" access hole, positioned so that final piping connections can be made by reaching through the access hole. Plastiflex part #SV8012 Cover Plate can be used to cover the hole after installation.
- Attach low voltage wires to Original VacPan terminal connections marked "low voltage only"
- Slide Original VacPan into the mounting slot and secure to toe kick using two #6 screws provided.
- Reach through the access hole and make final piping connections
Under Cabinet Installations
 Original VacPan requires a minimum of 2-1/4" toe-kick height.
- Once the Original VacPan location is determined, cut a 6-3/4" long x 1-3/4" high slot in the cabinet toe kick to accept the Original VacPan.
- Run vacuum tube piping and low voltage wire from the main piping line to the Original VacPan location.
- Access for final piping connections must be made.
Access From Below
If access is available from below, cut an access hole through the subfloor underneath the cabinet, positioned so that final piping connections can be made by reaching through the access hole.
Access Through Cabinet Floor
Access can be made through the finished cabinet floor. Cut a 2-3/4" x 3-1/2" access hole, positioned so that final piping connections can be made by reaching through the access hole. Plastiflex part #SV8012 Cover Plate can be used to cover the hole after installation.
Access Through Cabinet Toe Kick
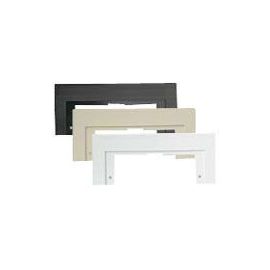
Access can be made through the cabinet toe kick by cutting up to a 10-1/2" x 4" slot and using the Original VacPan Quick Trim Cover Plate (included or Plastiflex part #VCPx01 sold separately). If required, score back of Quick Trim Cover Plate with a knife and snap along grooves for height adjustment.

- *Attach low voltage wires to Original VacPan terminal connections marked "low voltage only"
- **Slide Original VacPan into the mounting slot and secure to toe kick using two #6 screws provided.
- ***Reach through the access hole and make final piping connections
Check Out More Central Vacuum Automatic Dustpans & VacPan Repair Kits.
| Weight (lbs) | 0.450000 |
|---|---|
| Product Width (Inches) | 4 |
| Product Height (Inches) | 2.25 |
-
 -17%
-17%
Tornado Power Central Vacuum Maintenance Cloths
Was $29.95
Save $5.00 (17%) through 11/21/2024
Save: 17%
On Sale: $24.95
Save $5.00 through 11/21/2024$24.95
-
-
-
Product Description
Product Specifications
Product Videos
Product Reviews
Read about the Automatic VacPan Dustpan
The VacPan is a must-have for any existing or new central vacuum
Original VacPanThe Original VACPAN adds a new dimension of convenience to your central vacuum by giving your broom the power of a central vac. Simply brush dirt and debris toward the powerful suction plate and your floor is clean - instantly! Also available is the VacPan II which is a dual function central vacuum inlet valve system. This VacPan model offers the added convenience of a standard hose wall inlet in one compact design. Each VacPan model provides unique benefits, allowing you to pick the right model for every room. VacPan & VacPan II may be added to existing or new installations.
VacPan Installation Instructions
Using the VacPan is easy. Simply turn the convenient foot switch to the on position and sweep dirt and debris toward the VacPan. The powerful suction from your central vacuum system does the rest.
The VacPan is a perfect fit for any room where you sweep - kitchens, workshops, and garages. Installation is easy using standard fittings and pipes and can be installed in new and existing homes features a central vacuum system.
VacPan Installation Tips
- Plan the location of your Original VacPan to be conveniently located for sweeping clean-ups. Also, consider ease of access to vacuum tube piping connections during installation.
- The leading edge of the Original VacPan must sit flush with the finished floor.
- For maximum clearance, use Plastiflex part #SV8052 Universal Short 90 degree Elbow for connections to VacPan.
- Do not glue the connection between Original VacPan and elbow, to allow for future removal.
- Prior to final installation, check for an airtight seal between Original VacPan and elbow. Teflon tape may be used if required.
- Allow for 1/2" vertical play in vacuum tube piping an Original VacPan location, so that final piping connections can be made.
- In-Wall Installations
VacPan In-Wall Installations
- Original VacPan can be installed between wall studs inside walls.
- Original VacPan should be located tight to one side in stud space.
- Once the Original VacPan location is determined, cut a 6-3/4" long x 1-3/4" high slot in the wall and baseboard to accept the Original VacPan.
- The 2 x 4 wall bottom plate between the two studs must be removed. This can be achieved from below using a hole saw.
- In new home construction, the bottom wall plate can be removed directly. A 6-3/4" length of 2 x 4 can be used as a temporary rough in the block, that will force all trades to finish around, leaving a slot for the Original VacPan Floor contractor must run flooring under the block.
- Run vacuum tube piping and low voltage wire from the mainline to Original VacPan location.
- Access for final piping connections must be made.
Inlet Types and Installation Diagrams
Access From Below
If access is available from below, cut an access hole through the subfloor underneath the wall between the studs, positioned so that final piping connections can be made by reaching through the access hole.
Access Through Wall
Access can be made through the finished wall. Cut a 2-3/4" x 3-1/2" access hole, positioned so that final piping connections can be made by reaching through the access hole. Plastiflex part #SV8012 Cover Plate can be used to cover the hole after installation.
- Attach low voltage wires to Original VacPan terminal connections marked "low voltage only"
- Slide Original VacPan into the mounting slot and secure to toe kick using two #6 screws provided.
- Reach through the access hole and make final piping connections
Under Cabinet Installations
- Original VacPan requires a minimum of 2-1/4" toe-kick height.
- Once the Original VacPan location is determined, cut a 6-3/4" long x 1-3/4" high slot in the cabinet toe kick to accept the Original VacPan.
- Run vacuum tube piping and low voltage wire from the main piping line to the Original VacPan location.
- Access for final piping connections must be made.
Access From Below
If access is available from below, cut an access hole through the subfloor underneath the cabinet, positioned so that final piping connections can be made by reaching through the access hole.
Access Through Cabinet Floor
Access can be made through the finished cabinet floor. Cut a 2-3/4" x 3-1/2" access hole, positioned so that final piping connections can be made by reaching through the access hole. Plastiflex part #SV8012 Cover Plate can be used to cover the hole after installation.
Access Through Cabinet Toe Kick
Access can be made through the cabinet toe kick by cutting up to a 10-1/2" x 4" slot and using the Original VacPan Quick Trim Cover Plate (included or Plastiflex part #VCPx01 sold separately). If required, score back of Quick Trim Cover Plate with a knife and snap along grooves for height adjustment.
- *Attach low voltage wires to Original VacPan terminal connections marked "low voltage only"
- **Slide Original VacPan into the mounting slot and secure to toe kick using two #6 screws provided.
- ***Reach through the access hole and make final piping connections
Check Out More Central Vacuum Automatic Dustpans & VacPan Repair Kits.
Log In
Create New Account